Good News and Bad News

Good news: I heard back from the job I’ve been practicing my coding for the test they were going to send me!
Bad news: they decided to go with someone else….so there’s not coding test to practice for anymore.
But I’m not going to let that stop me from coding this time. I’ve take the time to mourn and I’m back at things today. This post will actually be the combination of a few days of coding. I hope you can enjoy it.

Image credit: Unsplash
More Array Cardio - this time .some(), .every(), .find(), and .findIndex() were covered.
.some() looks to see if there’s at least one thing in the array that you’re looking for and returns either true to false. The exercise has us try to see if there were people over the age of 19 in the array to confirm if they were adults.
The code we wrote looked like this:
const isAdult = people.some(function (person) {
     const currentYear = (new Date()).getFullYear();
     if (currentYear - person.year >= 19) {
          return true;
     }
});
This could be simplified down to be written like this:
const isAdult = people.some(person => {
     const currentYear = (new Date()).getFullYear();
          return currentYear - person.year >= 19;
     });
Which could be simplified down even more to be written like this:
const isAdult = people.some(person => (new Date().getFullYear()) - person.year >= 19);I really like being able to see this happen. It’s not all the time you can write out what you need for a function all on one line - but when it does happen, it just makes you feel good and want to smile. 😄
Next up is .every() that looks to see if everything in the array fulfills what you’re looking for and returns true or false.
You can actually use the same one-line version from earlier and replace “some” with “every” to get the result:
const allAdults = people.every(person => (new Date().getFullYear()) - person.year >= 19);.find() works like .filter(), but returns just the result that you’re looking for in the array. This time, we were looking to find an item in the array with a specific ID. The function can be written like this:
const comment = comments.find(function(comment){
     if(comment.id === 823423) return true;
});
A challenge with this one was to try and rewrite the function in the super simplified version, which I was actually able to do on my own without following along with the video. I was actually quite proud of myself for being able to do this. 😁
const comment = comments.find(comment => comment.id === 823423);.findIndex() finds the index position of the item you’re looking for inside of an array. I went the super simple way of coding this and was able to get it to work:
const index = comments.findIndex(comment => comment.id === 823423);The next part of the exercise was the remove the index that was found in the array. There were two ways to do this that were explained:
using .splice() to remove the index from the current array
creating a copy of the current array and then removing the item so the original array isn’t modified
The first option is rather simple and can be completed like this:
comments.splice(index, 1);The second option is a little more complex, but can be completed like this:
const newComments = [
     ...comments.slice(0, index),
     ...comments.slice(index + 1)
];
It does use spread (…) from ES6 (which I still have a hard time explaining, so I suggest going to the MDN docs and reading up on it there), but it does make it so you don’t have to modify the original array and can work with the new data.
Next up is working with HTML Canvas and making a basic “Windows Paint” for the browser. It doesn’t have anything to change the stroke weights or the color, but in the end it does do a really cool rainbow color effect using hsl() values. I had fun with this exercise. Once I had the basic canvas set up, I drew a face to see if things were working correctly.

Sometimes you just need to have fun when you’re coding.
And for the final result, we made the stroke change size as you continue to draw. It will pick up where it left off when you click to draw once again, showing the hsl() and the direction change set up in the code are working correctly.

All the pretty colors!
One thing that was suggested at the end of the exercise was using a Global Composite Operator with the Canvas Context to do different “blend modes” like you can in Photoshop. There’s a few you can choose from and you can view all the available options in the MDN docs here. It’s definitely something I’ll try to remember to do if I want to attempt to expand on this exercise.
Next up is some good things to know how to do in the browser Dev Tools. A good one that was shown first is when you inspect an area on the page, right click > Break on…> attribute modifications > then click where you have something being changed with JavaScript on your page. This will now show you where the JavaScript is being run in case you have no idea what is making is be modified on the screen. You do need to make sure to go back and turn it off since it will stop the page from running once you click that element again.
Another good one to know for when you have a lot of information being passed into the console is console.group(). This will put related information together based on what ypu pass into .group() with the same string being passed into .groupEnd() so it knows where the information stops. Here’s an example of this being used:
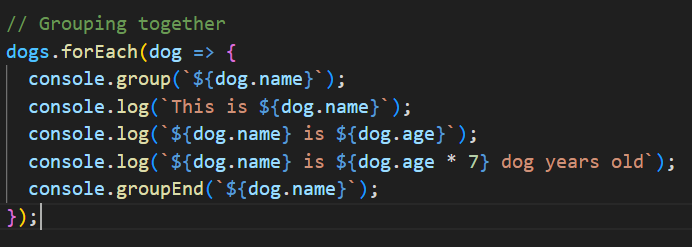
Always make sure to have .groupEnd() at the end of the informaiton - something I know I’m going to forget lol 😅
And the result in the console:

Much easier to read and grouped by the dog’s name
You can also switch out .group() with .groupCollapsed() so the info automatically shows up collapsed in console in case you have a TON of information in the console to check over. I doubt this will ever happen, but it’s a good one to know.
The last exercise I worked on was to select a range of check boxes in-between two that have already been checked. (Like when you go to your email and want to check a bunch of emails at once.) The challenge with this one was to try and work through it on my own. I got pretty far, but wasn’t able to figure out how to select all the check boxes with the shift key held down. Ended up working through the exercise with Wes and noticed I was on the right track, but I didn’t have the code set up correctly.
But I did know a few things before working through this with Wes:
I needed to select all the check boxes on the screen
I needed to have a variable that holds if the checkbox was changed or not
I needed to use forEach() to loop over the check boxes to see if they were checked or not
I needed to figure out how to check and see if the Shift Key was breing pressed when the second check box was selected
And I had something set up, but it wasn’t working. I was trying to edit styles when I didn’t need to do so, which was making more work for myself. And I was looking at the ‘change’ event when ‘click’ was actually better, which Wes went over in the video. He also though ‘change’ was the one you needed to use, but ‘click’ wokred out a lot better.
So I learned that I’m starting to get the hang of what I need to do with JavaScript. It’s just figuring out where I need to use it and how to set things up correctly. Which is better than where I was before since I was just lost when it came to figuring out something like this.
That’s going to be it for me today. Happy coding everyone! 👩💻